Getting Certified
A Guide to Owner Building in QLD

Proper planning is important - and it takes time
Preparing all the documentation required for your building approval can be overwhelming. We had quite a few setbacks during our own approval process due to missing information and / or small oversights.
Below we've shared with you all the steps we took and documents we provided to get our build approved with the certifier. Your own build requirements may differ from ours, but we hope this can act as a guide and save you some precious planning time so you can get to building your home as quickly as possible.
You should try and perform steps 1 - 3 before finalising the purchase of your land (you might be able to add these terms to your contract of purchase).
At the bottom of the page you'll find a checklist you can download and fill out as you go, so you don't miss any important steps 🤞. We've done our best to include as much information as we can, but we are not certifiers, so please do still employ an independent building certifier to guide you through the approvals process.
1. Check Property Overlays
Once you've chosen a block of land to purchase, you should check the environmental overlays on the property before making the purchase. Certain overlays can increase your planning costs, restrict your building plans, and / or add cost to your build.
Each council will have their own planning tool you can use to search the address of your property and view the overlays. Here is the link to Redland City Council's "how to" document for viewing overlays. The council area your building in should have a similar tool you can use, if you can't find it online, you should give them a quick call and ask where you can view property overlay information - we found our council very helpful! See some examples of overlay types below (though, there are many more), and how they might impact your building plans. If your land does have an overlay, you should speak with your certifier about what impact it will have on your ability to build, and what additional costs you may incur as a result of the overlay.

Bushfire
This overlay shows land at risk of bushfire. Depending on the risk rating of the overlay, you may need to clear vegetation and establish fire breaks on your block, and may need to upgrade your home's building materials to meet bushfire resistant standards.

Landslide
This overlay is present on blocks of land where there is a risk of landslides occurring. Generally, a geotechnical engineer will need to be engaged to assess the block, and in some cases, your ability to build may be restricted.

Environmental Significance
An overlay designed to protect land with high levels of biodiversity or native vegetation. This overlay may restrict you from clearing protected vegetation from your block, and thus impact your ability to build.

2. Site Surveying and Contouring
If your land hasn't already been surveyed, contacting a surveyor to create a survey plan is an important step before site planning can begin. The surveyor will be able to define your property boundaries precisely, preventing potential future disputes with neighbours. Professionally surveying your land will prevent potential accidents occurring and future legal disputes from building on your neighbours land, for example. The septic designer, engineer and certifier will likely require a copy of your survey plan as well.
Secondly, having a contour plan developed is normally also necessary to detail the land's elevations and terrain, which is required for the design of your foundations, site drainage and septic system (where required).

3. Soil Report & Septic Design
A soil report will often be required before the engineer can design the foundations for your build. The type and quality of the soil will impact the size and placement of the building's foundations. Our soil type was designated as 'P' meaning problematic due to the large amount of trees (and tree roots) on the property. For this reason, our pier holes were designed to be slightly larger than would have been required otherwise.
Additionally, the soil report will be used by your septic designer to design the size and location of the trench for your septic system (if your block requires an onsite wastewater treatment system).
Depending on the type of soil and size of septic system required, the amount of bedrooms you can build may be limited - which is why it is important not to skip this step before completing your land purchase.
You can see the photo of our septic design on the image to the left.

4. Complete Land Purchase
How Exciting! If you've completed steps 1 - 3 you should now know:
-
what overlays will apply to your property,
-
what impact these overlays might have and how to mitigate them and,
-
how many bedrooms you can build on your block (if you require a septic system)
Nice work!

5. Engage a Building Certifier
If you haven't already, now is the time to engage an independent building certifier. Remember - the certifier is the one who will grant your ability to build in QLD - not the council, so it is important to research and engage a suitable certifier early on.
I recommend calling a few certifiers and having a chat to see who you like. You will need to call on your certifier for advice and clarification throughout your entire build, so pick someone you think you'll work well with. The certifier's job is to ensure you build your home to the QBCC standard, and they'll be able to provide you with information about what stages your build will need to be inspected, and what forms and evidence you'll need to provide along the way.
You can check out our Youtube video here for more information on the inspection stages, and our experience in choosing a good certifier.
6. Submit Owner Builder Permit Application
Don't make the mistake I did and forget about submitting your owner builder permit! Forgetting this small step set us back 4 weeks (as that is the average permit processing time), and cost us 15k (as we lost the ability to claim for the full first home owners grant). As soon as you've purchased your block of land and decided to undertake an owner build, you should submit your permit application with the Queensland Building & Construction Commission (QBCC).
Click here to go to apply for an owner building permit with the QBCC. Note: you can only apply for an owner builders permit if you haven't held a permit within the last 6 years.
You'll need to estimate a budget, and create a scope of works when submitting your application. I've uploaded a copy of mine below you can feel free to use as a template if you like. The more detail you can add, the more likely you are to have your permit granted.

1. Create Budget
You will need to create a budget for the scope of works section of your owner builder permit application. Budgeting is a very important part of owner building, and I always recommend overestimating expected costs. We overestimated our costs in our permit application by $70k, just to be safe.

2. Create Scope of Works
The Scope of works should list what you plan on building, (e.g. type of home, how many bedrooms, bathrooms and living areas the home will have), the the estimated construction timeline. You should detail the building materials to be used and a breakdown of the build costs, and a total cost estimate.

3. Apply for Permit
Applying for your permit is pretty simple. All you'll need to do is fill out the form located on the QBCC website, submit the form, and pay the applicable fee. It took four weeks after the date of lodgement for our building permit to be granted and issued.
Example: Our Scope of Works


7. Apply for QLeave Levy Exemption
The QLeave levy is a fee imposed on building and construction work in Queensland, Australia, to fund the QLeave Portable Long Service Leave scheme.
Owner builders are exempt from paying the levy, but you are required to notify QLeave if the project is over $150,000.00 via the Levy Payer Portal, and obtain an exemption certificate. Your certifier will likely require a copy of this exemption certificate to certify your build.
Click here to access the portal and submit a levy exemption request.

8. Create Draft Site Plan
If your site requires earthworks (as ours did), you might want to engage a geotechnical engineer to create a draft site plan for you. They will be able to mark elevations and setbacks (to meet design and sitting requirements). We chose this option for our draft site plan, as we have a sloped block and wanted to carryout some earthworks and have the pier footings accurately designed by an engineer.
If your block doesn't require earthworks or foundation design (which would be quite rare from my understanding), you might be able to use the plan provided to you by the septic designer as your draft site plan. If you want to be able to do this, I would recommend specifying:
-
what setbacks you would like for your dwelling
-
the dwelling dimensions and,
-
how you would like the dwelling oriented on your block.
You'll need to take the minimum setback requirements of your local council and the Queensland Development Code into account. For our council (Redland City Council), we were required to have:
-
a minimum front setback of 6m
-
minimum rear and side setbacks of 1.5m
You can view specific requirements of design and sitting from the Queensland Development Code here. Your septic designer and / or certifier should be able to guide you on minimum requirements. If for whatever reason you need to complete your draft site plan with marked boundaries yourself, you can attempt to do it yourself and seek approval form your certifier, engage a building designer, or another qualified professional such as an engineer.

9. Foundation Design & Engineering
Most sites will require an engineer to design the foundations based on the soil type at the property. Even though many kit homes come with standard pier diagrams included, the soil type will impact the size of the foundations. For example, we were required to engage a geotechnical engineer for our pier design, despite purchasing a kit home with included pier diagrams.
Additionally, we were required to have an engineer conduct an assessment of the land for landslide risk and submit a Form 15, as our property is within a low risk landslide zone. This was a simple process, but increased the planning cost of our build by over $1,000. You may require an engineer to complete similar documentation for your build to achieve town planning approval, depending on the overlays on your property. Your certifier can guide you on this.

10. Queensland Liveability Requirements Checklist
The Queensland Livable Housing Design Standard was introduced in 2023, and is designed to ensures new homes are accessible and adaptable for older Australians and people with disabilities. As an owner builder, it is important to be across these new requirements, and many certifiers may require you to complete a checklist and sign a declaration stating your home will comply with the liveability design standard.
Due to the new standard, new homes must now include:
-
at least 1 step free entry
-
slightly wider internal doors and corridors
-
1 step free access into a bathroom and shower
-
an accessible toilet
-
reinforcing of bathroom and toilet walls to allow for handrails.
You should check your plans and ensure they meet these requirements. You may need to make some small changes to the floor plan yourself if the certifier requires more information / detail. See point 11 below for how we did this for our build.

11. Architectural Drawings & Smoke Alarms Plan
If your architectural drawings already meet all requirements including the Liveability Design Standard, you will still need to provide a smoke alarms plan showing the location of smoke alarms within the dwelling. You can have an electrician draft this up for you very easily. Alternatively, you can always draft one yourself using a free account with a software such as Canva or Magic Plan.
However, beware that there are very stringent requirements regarding the placement and number of smoke alarms in QLD homes. We used Magic Plan to create our smoke alarm plan (image on the left), though as an electrician, I am very familiar with the requirements.
If you would like me to create a smoke alarm plan for your build, you can fill in the form here.
Here is a link to a document detailing the placement requirements. And finally, here is a link to Canva and Magic plan if you plan on creating the smoke alarm plan yourself.
If you need to provide additional information detailing how you will meet the Liveability Design Standards, you can always upload your floor plan into a software like Canva and add some notes to demonstrate compliance. See the image below to see how I was able to add some additional notes to our floor plan to demonstrate compliance.

Example:
We uploaded our floor plan into Canva and added notes to demonstrate compliance with the Liveability Design Standards. Alternatively, a designer can do this for you.

12. Home Energy Rating (NatHERS)
As I've already mentioned, I am an electrician, but did you know I'm also a NatHERS assessor for existing homes? It is amazing how the orientation, building materials and appliances can impact the thermal efficiency and energy efficiency of your home.
As of 2023, all new homes built in Australia are required to meet or exceed a minimum NatHERS rating of 7/10 stars. NatHERS is an energy rating tool that rates the thermal and energy efficiency of homes. You will need to contact a NatHERS new homes assessor to create an energy efficiency plan and issue a NatHERS rating certificate of 7 stars or higher to demonstrate compliance the new standard. This will often require you to commit to installing high efficiency windows (double or triple glazed) and insulate the home, among other things.

13. Plumbing Approval
You will need to apply for plumbing approval with your local council and provide a copy of the approval to your certifier. In most cases, this is a straightforward process. They may want to see a copy of your septic design including a site plan and the type of system that will be installed. Often, your septic designer or certifier will be able to submit for this approval on your behalf for a fee.
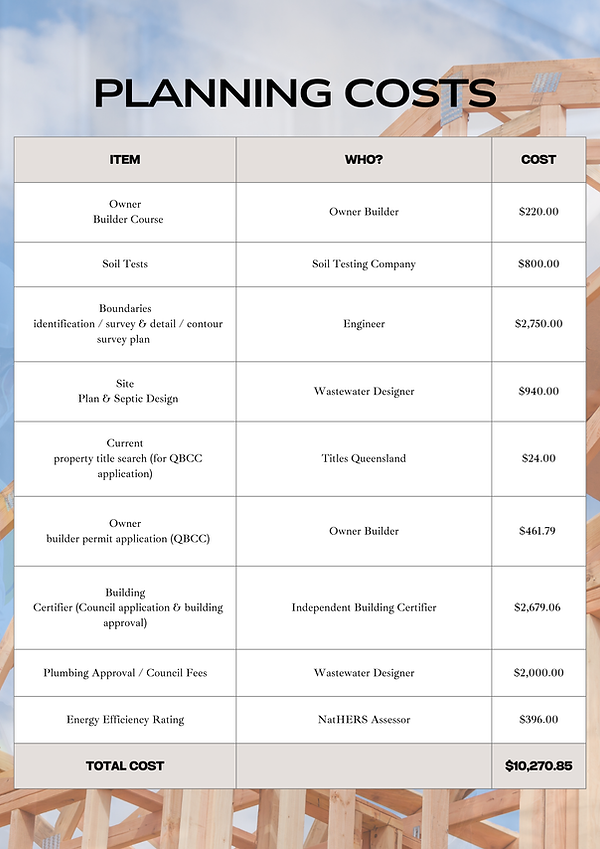
Our Total Planning Costs
Finally, I've shared below what our total costs of the planning process landed at. This included all checks & documentation required to achieve the approval to build from the certifier. Important to note, we produced the smoke alarm plan and did most of the design work ourselves. Hopefully this guide can help you plan your build well - on time, and on budget 🤞
.png)

Disclaimer
The information provided on this website is based on my personal experiences and research as an owner-builder in Australia. I am not a licensed builder, certifier, or legal expert, and the content shared here is for general informational purposes only.
While I aim to share helpful insights and resources, the information may not reflect the most current regulations, codes, or requirements applicable to your specific situation. You should not rely on this content as professional advice.
Before making any decisions or taking action, please consult with qualified professionals such as licensed builders, certifiers, or your local council to ensure compliance with all legal and safety requirements.
By using this website, you agree that I am not liable for any loss, injury, or damage arising from your reliance on the information provided.